
Last updated on July 29, 2025
Yoga is an ancient practice that unites the
body, mind, and breath to create
harmony and well-being. The word ‘Yoga’ comes from the Sanskrit word
‘Yuj’, which means ‘to unite’.
Through Yoga Asanas (yoga poses), breathing techniques, and meditation, you can
improve flexibility, strength, posture, and inner peace.
This page features 51 Yoga Poses with
step-by-step guidance, benefits, and practice tips.
Whether you are a beginner or an
advanced practitioner, these
yoga asanas will help you enhance your
physical fitness, mental clarity, and overall health.
Use the search box above to quickly
find any yoga pose or
jump to the one you want to learn.
Each pose includes detailed instructions and
links to its dedicated page so you can explore it in depth.
Down Facing Dog Pose : Adho Mukha Svanasana
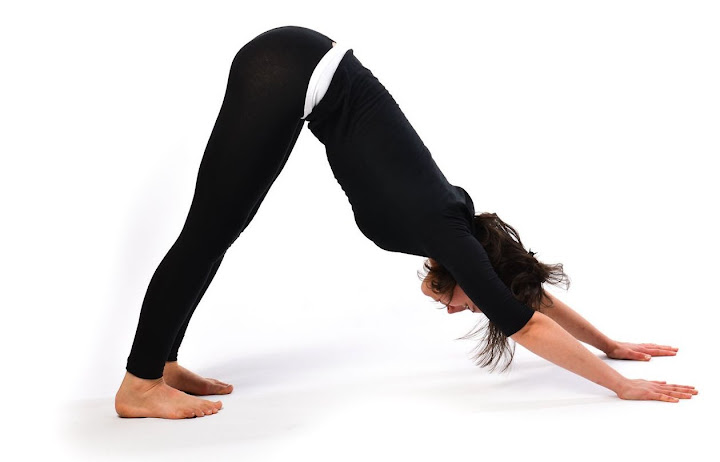
How to do it:
- Keep your legs shoulder width apart.
- Slowly, bend down, until your palms touch the floor ahead of you.
- Exhale while bending.
- Do not lift your heels off the floor.
- Don't bend your knees, but at the same time, don't lock them.
- Spread your fingers wide apart.
- Now, push your head between your arms, towards your knees. Feel the stretch in your legs.
The Benefits:
- This pose leaves you energized and rejuvenates the body
- It lengthens the spine, strengthens the muscles of the chest increasing lung capacity.
- It brings strength throughout the body especially the arms, shoulders, legs, feet. Helps to tone muscles
- It increases circulation to the brain
- Calms the mind and helps relive headache, insomnia and fatigue.
The Shooting Bow Pose : Akarna Dhanurasana

How to do it :
- Bend the left leg in knee and keep the foot on the thigh of right leg. Keep the right leg straight.
- Hold the big toe of the left leg with left hand, and that of the right leg with the right hand.
- Exhale, and inhaling start lifting the left leg with the left hand and pull it up to the left ear, and stabilize it at that point.
- Continue normal breathing.
- After few seconds come back to the original position.
- Now holding the right leg at big toe by fore finger and thumb of right hand raise it up to the right ear. Again after few seconds come back to the original position. This completes one round of Akarna Dhanurasana.
The Benefits :
- Strengthens feet, shoulders, thighs, buttocks and calves. Gives a beautiful shape to legs.
- Arms, shoulders and chest get stronger with practicing the shooting bow!
- Good for people who work a lot with their hands such as writing or drawing. Nerves are stimulated and refreshed.
- Beneficial for your belly as it contracts and releases the muscles and moves the whole abdomen area.
- Stimulates digestion, thus helpful in constipation and indigestion Prevent and relieve pain in the lower regions of the abdomen and the larger intestines
- This is also one of the yoga poses that, if done regularly, can help if you have irregular menstruation.
- It opens chest and gives your lungs room to expand and breathe.
The Side-Reclining Leg Lift : Anantasana

How to do it :
- Lie down on your back in a straight position.
- Turn towards your left hand side.
- Now lift up your right leg in a 90 degree angle. Place your left hand below your head in order to support it.
- Raise your right hand up in the air and now try to catch the toes of your right leg with your fingers.
- Stay in this position for about 20 seconds; count your breath and then release.
- Slowly turn towards the other side and repeat the same activity on the right hand side too.
- Do not forget to count your breath every time you switch to a new position.
- As a beginner it would be difficult for you to balance your body in this position. But you can certainly take help and rest your body against the wall so that it helps you to get balance. Also, if you have neck pain problems, it would be advisable to consult a doctor, physiotherapist
The Benefits :
- Anantasana is a very good exercise for stretching the muscles of your back and side torso as well as the hamstrings and the muscles of the calves.
- Pelvic floor muscles and hip muscles are toned and abs are firmed. Additionally it strengthens armpit muscles and shoulders.
- Anantasana increases flexibility in legs and prevents issues of hernia.
- Beneficial for your heart and the supply of oxygen throughout your body.
- Helpful in arthritis, regular practice can prevent further worsening.Risk of sciatica is minimalized.
- Good for your bladder and for women beneficial for the ovaries while men have benefits for their prostate glands. Menstrual disorders are reduced.
- Reduces mental stress and strain as well.
The Crescent Moon Pose : Anjaneyasana

How to do it :
- Sit comfortably in the vajra-asana (thunderbolt pose).
- Kneel up on your knees until your back, buttocks and thighs are aligned.
- Extend your left foot forward bending your left knee at about a 90-degree angle.
- Place the palms of your hands together at the heart in the anjali-mudra.
- Raise your arms straight up keeping the palms together while bending the head backward and looking up.
- Slowly bend backward stretching the arms backward and straightening out the right leg. Hold this position as long as comfortable while breathing gently through the nostrils.
- Come back to the vajra-asana and reverse the posture by alternating legs.
The Benefits :
- Strengthens the upper and lower thigh muscles.
- Good for sciatica pain; stretches and soothes the hamstrings and leg muscles.
- Opens hips, stretches back, neck, shoulders and front body. Gives abdominal organs space.
- Opens chest, allows lungs to expand and heart to pump blood effectively.
- Recommended for athletes and runners as it stimulates the lower body.
- As a heart-opening exercise, it stimulates the Anahat (Heart) chakra.
The Half Moon Pose : Ardha Chandrasana

How to do it :
- Start with Triangle Pose (Trikonasana), with the left hand on your hip.
- Bend your right knee slightly moving it forward.
- Move your right hand forward a few inches away from the right foot.
- Exhale and press your right hand and heel against the floor for balance.
- Lift your left leg parallel to the floor.
- Raise your left hand and align it with your left leg; balance on the right leg.
- Look up, focus on your fingers and hold for a few seconds.
- Lower the leg and exhale. Repeat on the opposite side.
The Benefits :
- Expands chest and shoulders.
- Increases hip joint mobility.
- Strengthens thighs and calves; stretches hamstrings and groin.
- Improves spine flexibility and neck mobility.
- Boosts proprioception (balance) of feet and ankles.
- Helps digestion, relieves stress and aids menstruation health.
The Half Plough Pose : Ardha Halasana

How to do it :
- Lie flat on your back with legs stretched fully.
- Keep heels and big toes together.
- Stretch arms by your sides with palms down.
- Inhale, press palms down and raise one leg straight up without bending the knee.
- Exhale, slowly bring the leg down. Repeat with other leg.
- Raise both legs together to 30°, 60°, and 90° angles; hold at each stage.
- Fix gaze on big toes; lower legs slowly with pauses at 60° and 30°.
The Benefits :
- Improves abdominal muscle elasticity.
- Prevents prolapse of abdominal organs.
- Helps menstrual disorders and constipation.
- Relieves varicose veins and hernia prevention.
- Can be practiced in bed for constipation relief.
The Half Spinal Twist : Ardha Matsyendrasana

How to do it :
- Sit in a comfortable cross-legged position.
- Straighten legs forward, bend right knee and bring heel close to left hip.
- Bend left knee upward and place left foot flat outside right thigh.
- Turn spine left, bring right arm outside left knee and grasp left foot.
- Turn head left and bend left arm behind back; keep spine aligned.
- Repeat on the other side.
The Benefits :
- Stimulates abdominal organs (pancreas, liver, intestines).
- Improves spine flexibility and relieves upper back tension.
- Helps constipation and digestion issues.
- Alternating compression and release massages internal organs.
The Half Locust Pose : Ardha Shalabhasana

How to do it :
- Keep hips close to the floor and legs straight together.
- Stretch arms back along sides.
- Place chin on the floor.
- Make fists and place them on the floor facing upwards.
- Inhale, press fists down and raise left leg as high as possible without bending.
- Hold for 5 seconds, exhale and lower the leg.
- Repeat with the right leg.
The Benefits :
- Improves blood circulation and digestion.
- Helps reduce fat from thighs, hips, waist and abdomen.
- Beneficial for diabetic patients and women’s reproductive organs.
- Relieves constipation and tones lower body.
The Bound Angle Pose : Baddha Konasana

How to do it :
- Sit on the floor with the legs together and extended straight out in front. Keep the back straight, shoulders level and head straight. Place the hands, palms down, flat on top of the thighs then inhale deeply.
- Exhale and bend the knees drawing the feet toward the torso.
- Place the soles of the feet together, clasp the hands over the feet interlocking the fingers pulling the feet closer and placing the heels against the perineum. The outer edge and small toe of each foot should touch the floor.
- Lower the knees to the floor and keep the back straight. Use the elbows to press down on the thighs if necessary to bring the calves and knees to the floor. Hold the posture breathing gently through the nostrils.
- Release the posture and sit with the legs extended out and hands on the thigh
The Benefits :
- This asana stimulates abdominal organs, ovaries and prostate gland, bladder, and kidneys.
- Stimulates the heart and improves general circulation
- Stretches the inner thighs, groins, and knees.
- Helps relieve mild depression, anxiety, and fatigue.
- Soothes menstrual discomfort and sciatica
- Helps relieve the symptoms of menopause
- Consistent practice of this pose until late into pregnancy is said to help ease childbirth.
The Locked Lotus : Badda Padmasana

How to do it :
- Assume the Padmasana posture, placing the feet high on the thighs, close towards the groin.
- Extend your right arm behind your back and reach round until your right band is near the left hip.
- Lean forward a little.
- Twisting the trunk to the right, catch hold of the right big toe, resting on the left thigh firmly with the forefinger and the middle finger.
- Sit erect and hold the position for a few seconds.
- Similarly, extend your left arm behind your back and crossing the right forearm, reach round until your left hand is near the right hip.
- Lean forward a little.
- Twisting the trunk to the left and bringing the shoulder blades together, catch hold of the left big toe resting on the right thigh firmly with the forefinger and the middle finger.
- Sit erect and hold the position for a few seconds.
- The arms and legs are now firmly locked-up.
- Keep the spine, neck and head erect.
- Draw in the abdomen.
- Both knees must press the ground.
- Look straight ahead.
- Breathe normally.
- This is the final position.
- Maintain this posture motionless for about ten seconds or as long as you are comfortable.
- Release the hands and unlock the foot lock.
- Stretch out the legs again and assume the normal sitting position.
- Practice the same, alternating the legs.
The Benefits :
- The abdominal organs receive thorough massage
- Useful for curing back ache and neck pain
- Prevents and cures constipation
- Crossing the hands behind results in better respiration and gets rid of drooping shoulders
- It is an excellent meditative posture.
The Crow Pose : Bakasana

How to do it :
- Place the palms of both hands on ground and then place the knees above the elbow on the arms.
- While taking deep breath place the body weight on palms and then try to lift the legs from ground to upside as possible.
- Now stay in this posture from few seconds to one minute.
- Exhale to lower the feet slowly to the ground and squat.
The Benefits :
- Strengthens arms and wrists.
- Strengthens upper back.
- Strengthens abdominal muscles.
- Abdominal organs get toned up.
The Child Pose : Balasana

How to do it :
- Sit on your knees with your feet together and buttocks resting on your heels.
- Separate your knees about the width of your hips. Place your hands on your thighs, palms down. (This is the vajra-asana or Thunderbolt Pose).
- Inhale deeply, then exhale as you bring your chest between your knees while swinging your arms forward.
- Place the soles of the feet together, clasp the hands over the feet interlocking the fingers pulling the feet closer and placing the heels against the perineum. The outer edge and small toe of each foot should touch the floor.
- Breath gently through your nostrils as you hold the posture. Hold for about one to two minutes. Then return to an upright kneeling position with your back straight and your hands on your thighs.
- Repeat the posture at least one more time.
The Benefits :
- The bala-asana gently stretches and relaxes the shoulders, neck, back muscles and thighs
- Gives a nice stretch to the hips and back muscles while it is at the same time simply relaxing your whole body. Your mind can relax with this focus to the inside.
- People suffering from hyperactivity can learn to use this exercise as an anchor, a pose from which to find back to peace and focus. Also bipolar conditions can be helped by performing the child’s pose.
- With its many benefits Balasana is a posture that is loved by kids and seniors alike. With the forward bend and the complete relaxation in the posture it is a perfect pose for reducing high blood pressure.
The Beneficial Pose : Bhadrasana

How to do it :
- Starting in Vajasana (thunderbolt posture).
- Separate the knees as far as possible while keeping the toes in contact with the floor.
- Allow the buttocks and perineum to rest flat on the floor in between the feet. (if this is not possible place a blanket under the buttocks
- Without straining, try to separate the knees further.
- Place the palms onto the knees and lengthen the spine.
- Look to the tip of your nose (slightly cross eyed) and concentrate on keeping the eyes and mind still.
- Breath slowly and deeply, listening to the sound of your breath
- To exit, bring the knees together and come to any comfortable sitting posture.
The Benefits :
- Primarily a meditation posture, helping to calm the mind. (hold for extended periods of time)
- Strengthens pelvic floor muscles.
- Helps to relieve piles.
- Can reduce menstrual discomfort.
- Strengthens the back muscles, improving alignment of the spine.
- Opens the hips and abductor muscles of the thighs.
- Increases flexibility and lubricates ankle and knee joints
- Good during pregnancy (believed to aid in childbirth if practices throughout pregnancy)
- Reduces stress and anxiety.
The Cobra Pose : Bhujangasana

How to do it :
- Lie on your stomach with your toes flat on the floor and forehead resting on the ground.
- Keep your legs close together, with your feet and heels lightly touching each other.
- Place your hands (palms downwards) under your shoulders, keeping your elbows parallel and close to your torso.
- Taking a deep breath in, slowly lift your head, chest and abdomen while keeping your navel on the floor.
- Pull your torso back and off the floor with the support of your hands. Put equal pressure on both the palms.
- Keep breathing with awareness, as you curve your spine vertebra by vertebra. If possible, straighten your arms by arching your back as much as possible; tilt your head back and look up. Shoulders should be away from your ears, Keep your shoulders relaxed, even if it means bending your elbows. With regular practice, you will be able to deepen the stretch by straightening the elbows.
- Ensure that your feet are still close together. Keep smiling and breathing. Smiling Cobras!
- Don’t overdo the stretch or overstrain yourself. Breathing out, gently bring your abdomen, chest and head back to the floor.
The Benefits :
- Stretches muscles in the shoulders, chest and abdominals
- Decreases stiffness of the lower back
- Strengthens the arms and shoulders
- Increases flexibility
- Improves menstrual irregularities
- Elevates mood
- Firms and tones the buttocks
- Invigorates the heart
- Stimulates organs in the abdomen, like the kidneys
- Relieves stress and fatigue
- Opens the chest and helps to clear the passages of the heart and lungs
- Improves circulation of blood and oxygen, especially throughout the spinal and pelvic regions
- Improves digestion
- Strengthens the spine
- Soothes sciatica
- Helps to ease symptoms of asthma
The Wheel Pose : Chakrasana

How to do it :
- Lie flat on the back in the shava-asana.
- While exhaling bend the knees and bring the feet as close to the buttocks as possible with the soles of the feet flat on the floor.
- Bend the arms at the elbows and place the palms of the hands flat on the floor directly under each shoulder with the fingers pointing toward the back.
- While inhaling slowly, begin to raise the head, back and buttocks off the floor while arching the spine.
- Continue to press downward on the hands and feet while raising the hips and stomach as high as possible. Hold for the duration of the held inhaled breath. When you can't hold the breath comfortable any longer, slowly exhale and return the back to the floor, slide the legs out straight returning to the shava-asana.
- The chakra-asana is more challenging than most other yoga postures. Don't be discouraged if your unable to accomplish it right away. Even attempting this posture without successful completion holds great benefits.
- First and foremost is the strength and suppleness it restores to the spine. It strengthens the arms, shoulders and upper back as well and stimulates the cardiovascular system. The chakra-asana has an overall tonic effect for the entire body. As the natural suppleness of the spine is restored after a period of practice you can begin to perfect the form of this asana and thus experience greater benefits.
- First be certain that the arms are as straight as possible with very little to no bend in the elbows. When you can hold this comfortably, begin breathing through the nostrils while holding the posture and attempt to get a greater arch in the spine by bringing your hands closer to your feet and/or bringing your feet closer to your hands.
- Finally, you can extend the duration of the chakra-asana by doing several repetitions in sequence without resting in-between. As you return from the posture keep the hands behind the shoulders and the soles of the feet flat on the floor and as soon as the back returns to floor immediately raise it and enter the full posture again.
- The chakra-asana is either held for the duration of the inhaled breath or between one and three minutes while breathing gently through the nostrils.
- Repeat it two or three times.
The Benefits :
- This pose has many benefits for the body. One of them is obviously that you get more flexible through this unusual turn of your body.
- It also stretches the whole body in a way that it is not stretched normally. This aides the digestive system and bowel movement.
- Your back also benefits from the turn in the other direction and tension caused by making a hunchback or sitting in one position for a long time is reduced.
- Energetically this pose stimulates the Manipoor Chakra, the solar plexus chakra on your navel. This is your action chakra, the one that distributes energy to your whole body. The energy of this chakra makes you feel active and alive!
- Maybe this is why children just love this pose - seeing the world upside down is also always great!
- And last but not least this pose also strengthens your arms as they need to hold your weight.
The Staff or Stick Pose : Dandasana

How to do it :
- Sit with the legs outstretched in front, feet hip-width apart.
- Straighten each leg, one at a time, and join the inner sides of your legs and feet.
- Place your hands on the floor alongside your hips, fingers pointing forward.
- Lengthen the calf muscles, and stretch your knees and toes.
- Keep your knees straight.
- Engage the thigh muscles and flex the feet. The heels may come up off the floor.
- Press your palms down to stretch your elbows and arms.
- Stack the shoulders directly on top of the hips.
- Lift your abdomen, freeing the diaphragm of tension.
- Breathe smoothly and naturally as you hold the pose.
- Hold
The Benefits :
- Improves digestion.
- Tones the kidneys.
- Helps to prevent sciatic pain.
- Stretches and activates the muscles of the legs.
- Prevents tiredness in the feet by stretching the muscles of the feet.
The Bow Pose : Dhanurasana

How to do it :
- Lie on the stomach with the head turned to one side and the arms alongside the body with palms facing upward.
- Turn the head and place the chin on the floor. Exhale, bend the knees, reach back with the arms and grasp the right ankle with the right hand and the left ankle with the left hand.
- While inhaling, slowly raise the legs by pulling the ankles up and raising the knees off the floor while simultaneously lifting the chest off the floor. Hold the inhaled breath. The weight of the body should be resting on the abdomen.
- Tilt the head as far back as possible. Hold the posture as long as you can comfortably hold the inhaled breath.
- Slowly exhale bringing the knees to the floor, release the ankles, slowly bring the legs and arms straight down on the floor and turn the head to one side, assuming the prone posture you began with..
The Benefits :
- The most obvious benefit of the dhanur-asana is that it restores flexibility to the spine.
- Regular practice will relieve lower back pain and release tension and strain in the upper back and neck area.
- The alternating stretching and releasing of the abdominal muscles increases blood flow to this area and aids all sorts of digestive disorders and discomforts.
- Strain or fatigue in the legs is also released after a few repetitions. Extended practice will help develop upper-body strength.
The One legged Pose : Ekapadasana

How to do it :
- Stand with the feet together and the arms by your sides (see the tad-asana).
- Focus the eyes straight ahead on a spot midway between waist and eye level and remain focused there throughout this asana. (standing about five feet from a wall would be helpful).
- Inhale and extend the arms directly in front, parallel with the floor with thumbs touching.
- Exhale and raise the right knee bending the leg at a 90 degree angle, pause for a moment then extend the leg straight out in front pointing the toes forward.
- Pause for a moment then swing the leg backward while bending forward at the waist.
- Breath slowly through the nostrils and make sure the arms, torso and legs are parallel with the floor.
- Hold the posture for at least 30 seconds and then return slowly to a standing position.
The Benefits :
- The ekapada-asana tones and strengthens leg muscles, improves sense of balance and helps sharpen concentration.
- The ekpada requires that you become aware of your body/mind as a whole. As you practice this posture turn the attention away from distractions of the mind and center it on full body-awareness. Continual effort in the ekpada-asana in this way will help cultivate concentration.
- The "closed eyes" variation intensifies the effect of the posture. Instead of relying on a fixed point of vision as an "anchor" the practitioner will cultivate an inner stability. The ekpada-asana also gives strength to the hips and lower back.
The Eagle Pose : Garudasana

How to do it :
- Stand with the feet together and the arms by your sides (see the tada-asana or mountain pose).
- Draw the left foot upward bending the knee and wrap the left foot around your right leg as you rest the back of your left thigh on the right thigh.
- Cross your arms at the elbows, left over right.
- Join the palms of your hands together keeping the fingers pointed upward
- Inhale and hold the posture for the duration of the inhaled breath.
- Exhale and return to the tada-asana.
- Repeat the posture on the opposite side, wrapping the right leg over the left and the right arm over left
The Benefits :
- The Garuda-asana strengthens the legs, knees and ankles, tones muscles of the leg and relieves cramps of the legs.
- Garuda Asana stretches and strengthens shoulder, elbow, wrist, hip, knee and ankle muscles.
- Improve balance and concentration.
- Improve digestion and elimination
- Improved focus
- Open shoulder joints, hips and IT band
- Improves circulation to all joints.
The Cow Face Pose : Gomukhasana

How to do it :
- Sit in a crossed-leg position, right leg over left.
- Spread the legs as far apart as possible without bending the knees.
- Bend the left knee and place the bottom of the left foot against the inner left thigh. Bring the left heel as close to the perineum as possible. Keep the left knee on the floor.
- Grasp the right foot with the left hand and keeping the foot on the floor place the heel of the right foot against the front-left portion of the left buttock. The right knee should be directly on top of the left knee.
- Inhale slowly through the nostrils and raise the right hand over the head and bend the right elbow. Reach behind the back with the left hand and clasp the fingers of both hands (forming an "s" shaped lock).
- Hold the posture as long as you can comfortably hold the inhale breath. Exhale slowly and then repeat the posture reversing the arms and legs.
The Benefits :
- This posture stretches the arms, upper back, chest and the sides of the chest and abdomen.
- As the shoulder blades are stretched backward the lungs are expanded and as the abdominal muscles are lifted the stomach is toned.
- It helps to relieve neck strain, backache and tight shoulders. The hands, fingers and wrists are strengthened.
The Plow Pose : Halasana

How to do it :
- Lie flat on the back in the shava-asana.
- Inhale through the nostrils. Place the palms face-down on the floor. Keeping the hips on the floor, bend the knees and bring them up toward the stomach while exhaling.
- Inhale, then while exhaling, raise the legs straight up perpendicular to the floor. You may support your hips with your hands or leave the arms flat on the floor, whichever is most comfortable.
- Exhale and continue to raise the legs over the head, bending at the waist, lifting the back and buttocks until the toes touch the floor directly in back of the head. Keep the feet together. If the lower back is supported by the hands try returning the arms flat to the floor with the palms facing down. If you are unable to comfortably place the arms on the floor continue to support the lower back with the hands.
- Keep the knees straight. Breath slowly through the nostrils and hold the posture for several minutes. If you cannot touch the floor with your toes hold them as close to the floor as possible and continue to exert effort to lower them.
- Reverse the steps to return to the shava-asana.
The Benefits :
- The benefits of this posture, like the sarvanga-asana, are numerous. All of the muscles and ligaments in the calves and thighs are stretched resulting in greater leg flexibility. People suffering from leg cramps will find great relief from the hala-asana.
- Since the abdominal area is contracted, blood compressed out of this area releases toxins and when the contraction is released the area is flooded with richly oxygenated blood.
- The contraction also helps to relieve gas and stimulates a sluggish digestive system.
- Similar effects take place as the neck and chest area is compressed effecting the throat, thyroid, parathyroid and lungs.
- ">Upper and lower back pain or discomfort is relieved due to the forward stretching of the spine.
The Hand Foot Big Toe Pose : Hasta Pada Angusta Asana

How to do it :
- Sit on the floor with the legs together and extended straight out in front. Keep the back straight, shoulders level and head straight. Place the hands, palms down, flat on top of the thighs. Spread the legs as far apart as possible without bending the knees.
- Bend the left knee and place the bottom of the left foot against the inner left thigh. Bring the left heel as close to the perineum as possible. Keep the left knee on the floor.
- Stretch both arms straight out in front of you, then keeping the back straight turn slowly at the waist toward the right aligning the arms with the right leg.
- Inhale slowly while raising the arms over the head and arching the back.
- Exhale and slowly while bending forward bringing the chest down to the right thigh. Clasp the big toe of the right foot with the first finger of both hands. Hold this position for the duration of the exhaled breath.
- Inhale slowly through the nostrils releasing the posture while sitting up straight.
- Straighten the left leg and return to the seated position described in step 2 then repeat the posture, this time bending the right leg.
The Benefits :
- Relaxes the muscles of the ankles and toes.
- Brings steadiness of mind and serenity.
- The hasta-pada-angusta-asana benefits in spinal stretch, abdominal toning, gastro-intestinal stimulation.
- Rectifies flat feet.
- In this posture the spermatic duct that carries the semen is pressed and thereby the flow of semen outside is checked.This enables one to lead a celebrate life.
The Crocodile Pose : Makarasana

How to do it :
- Lie on the chest and stomach.
- Lift the head and chest.
- Bend the arms at the elbows.
- Rest the elbows on the ground.
- Form a cup shape with both hands.
- Place the head on the heels of the hands.
- Place the head between the palms.
- Relax the whole body. Breathe normally and slowly. Feel the whole body touching the ground and the deep relaxation in all your muscles.e elbows.
The Benefits :
- This is beneficial in Asthma.
- For those who have acquired wrong process of respiration (due to Asthma etc.) this Asana is more useful.
- Abdominal muscles get automatic massage.
- It is very useful in Spondalities of Lumber region.
- It also maintains flexibility of Backbone and gives exercise to the nerves attached to the spine.
- This is also beneficial in Sciatica Problem.
The Frog Pose : Mandukasana

How to do it :
- Sit in vajrasana.
- Make fists of both your hands by placing the thumbs inside the fingers.
- Place the fists on your navel together.
- Press the fists against your abdomen and bend forward while exhaling.
- Keep your eyes open and look in front of you.
- Maintain this pose for 2-3 minutes and then come back to the vajrasana while inhaling.
- Repeat four-five times.
The Benefits :
- It activates the pancreas. As a result, there is in quantity of Insulin produced in the body. As such is beneficial in curing diabetes.
- Abdominal organs are massaged in this yoga. It is beneficial in stomach problems,constipation & digestive disorders.
- It is beneficial for the heart and pancreas.
- Its controls your weight
- It will cure the pain in knees, ankles and toes
- Keep your blood pressure normal
- Keep all your gastric problems at bay
- Good asana for women to help in their reproductive system.
- Increase sexual ability, help to reduce fat.
The Cat Pose : Marjariasana

How to do it :
- Come onto your fours. Form a table such that your back forms the table top and your hands and feet form the legs of the table.
- Keep your arms perpendicular to the floor, with the hands directly under the shoulders and flat on the ground; your knees are hip-width apart.
- Look straight ahead.
- As you inhale, raise your chin and tilt your head back, push your navel downwards and raise your tailbone. Compress your buttocks. Do you feel a slight tingle here?
- Hold the Cat pose and take long, deep breaths.
- Follow this by a countermovement: As you exhale, drop your chin to your chest and arch your back up as much as you can; relax the buttocks.
- Hold this pose for a few seconds before you return to the initial table-like stage.
- Continue five or six rounds before you come out of this yoga posture.
The Benefits :
- Brings flexibility to the spine
- Strengthens wrists and shoulders
- Massages the digestive organs and improves digestion
- Tones the abdomen
- Improves digestion
- Relaxes the mind
- Improves blood circulation
The Monkey Pose : Markatasana

How to do it :
- Lie down on the mat. and spread the arms so that they are perpendicular to the body.
- Bring the feet near the hips.
- Inhale and with exhalation turn the knees to your left touching the left knee to the mat.
- Turn the face towards right side.
- You will face a slight stretch in the lower back region. For more stretching you can bring the knees upwards towards the left arm.
- Stay in this pose for 15 seconds to 30 seconds.
- Now switch sides and stretch in opposite direction.
The Benefits :
- This exercise is especially useful for backache, cervical, sodalities, slip disc, sciatica.
- It cures stomach ache, dysentery, constipation, gas and makes the stomach light.
- This is beneficial for the hip, joints pain. It cures all the deformities of the spine.
The Fish Pose : Matsyasana

How to do it :
- Lie flat on the back in the shava-asana.
- Keeping the buttocks on the floor, inhale and raise the head, shoulders, back and upper arms off the floor arching the back and raising the chest up. Tilt the head back and place the top of the head flat on the floor.
- Hold for the duration of the inhale breath or breath gently through the nostrils to remain in the posture longer.
- Return to the shava-asana
The Benefits :
- Removes stiffness of the cervical, thoracic & lumbar region & increase the flow of nerve current to them.
- Reduces the rounding of the shoulders & massages the shoulder and neck.
- Increase the capacity of the lungs, thereby releasing the bronchial spasms, blockages & the releasing asthma & other respiratory problems.
- Energizes the parathyroid, pituitary and pineal glands.
The Peacock Pose : Mayurasana

How to do it :
- Sit down on the floor on your knees.
- Spread your knees apart.
- Place both your palms in between your knees.
- The elbows should be touching the abdomen on either side of the navel.
- Stretch out both your legs backwards and push your trunk forward. Make the upper part of your body parallel to the ground.
- Balancing on your palms and elbows, raise both legs off the ground.
- The head, neck, chest and legs should all be in a straight line.
- Remain in this posture for as long as you can.
- Put your feet back on the ground.
- Now fold your legs and place the knees on the ground.
- Remove your hands from the ground and sit on your soles.
The Benefits :
- Good posture for burning the belly fat, activating the digestive fire and increasing your hunger. It helps to digest undigested food which is stuck in the intestines and because of that works against constipation and acidity.
- It can also prevents colitis, piles and gastric problems.
- Helps to reduce the excess of ama and remove toxics from the system.
- Mayurasana reduces and cures problems which occurs in our body because of the three humors vata, pitta, kapha
- It is very helpful for the abdominal organs like spleen, pancreas, liver, bladder, gall bladder and prostate glen, bowels. Problems like irritable bowel syndrome or the risk of having a stone in the kidneys can be prevented and cured.
- This pose increases the blood flow in the system and purifies the blood which: This makes you look more beautiful, shining and glowing from the inside and is also a help for diabetes patients.
- This balancing pose will make your arms very strong.
- Provides great sexual ability in men and women as well as reduces the congestion of the vagina in women and it prevents and cures impotence in men. Because of the pressure on the abdominal organs is also good for fertility of men and for menstruation problems of women.
- With a regular practice you can reduce the stress level in your mind, it makes you cool and calm, refreshes you brain and thoughts and makes you more focused and concentrated. This is why this pose is beneficial when you are suffering from depression.
The King of the Dance Pose : Natarajasana
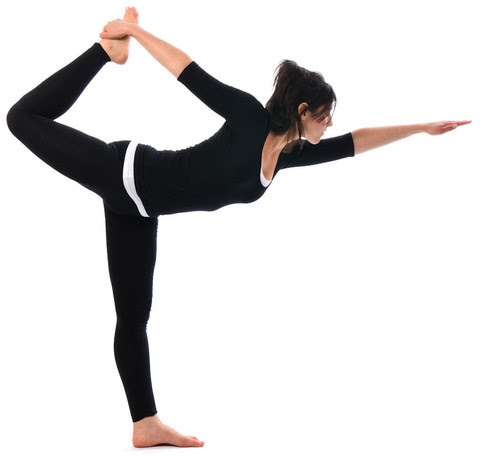
How to do it :
- Stand erect with your legs together and hands by the sides as in Tadasana.
- Shift your body weight to the right leg.
- Inhaling raise your left leg off the ground and take it backwards.
- Bend the left leg at the knee.
- Raise the leg further up and catch hold of the big toe with your left hand. Simultaneously extend the right arm in front so that it is parallel to the ground.
- Now raise the right arm further so that it makes an angle of 45 degrees with the floor.
- Pull your left leg with your left hand to raise it as high as possible.
- Look in front and fix your gaze.
- Maintain this posture for a minute.
- Exhaling slowly, bring your left leg and right hand down to the starting posture.
- Repeat the same steps as above alternating the legs and hands.
The Benefits :
- Nataraja-asana, King of the Dance posture strengthens and tones your leg muscles and tightens upper arm muscles, hips, and glutes.
- The Dancer’s Pose is a balancing yoga pose. All balancing yoga poses help with concentration, centering your mind and body, and with bolstering your inner determination.
The Boat Pose : Naukasana

How to do it :
- Lie flat on the back keeping legs together and arms by the side of the body.
- Take a deep breath and hold it in while raising head, shoulders, arms, trunk and legs simultaneously from the ground.
- Keep the arms in line with the toes and at the same level of toes. Keep the arms straight with the palms down. Look towards the toes.
- Remain stable in the position while holding the breath for a minimum of 5 seconds or more, if possible.
- Return to the ground slowly as you exhale.
- Relax the whole body and take 3-5 long and deep breaths.
The Benefits :
- Stimulates the functioning of the digestive system.
- Rectifies nervous disorders therefore improves the functioning of nervous system.
- Helpful in toning all the organs and removes lethargy.
- Improves the whole body structure thus effective in curing navel displacement
- Maintains the sugar level in the body therefore good for diabetes.
- Improves the state of hormonal imbalance in the body.
- Enhance blood circulation in the body.
- Improves the functioning of liver, lungs, kidneys and pancreas.
- Eliminates stress, tension and anxiety, thus gives deep relaxation and restores freshness.
- Beneficial for people having hernia though they must first consult with their doctor.
The Lotus Pose : Padmasana

How to do it :
- Sit on the floor in the Easy Posture.
- Take your right foot in your hands, and slowly place it on your left thigh as close to the crease of your hip as you can.
- Take your left foot in your hands, and slowly place it on your right thigh as close to the crease of your hip as you can.
- Be aware of correct posture as you open your chest, lengthen your spine, and gently pull your shoulders back; feel yourself relax as you sit proud, with your chin held high.
- Extend your arms over your thighs, and rest your hands and wrists on your knees, with palms facing upward.
- Place your hands in the Jnana Mudra Position.
- Close your eyes and hold this pose for 5 to 10 slow deep breaths.
- As you breathe, try to engage the Mula bandha and Uddiyana bandha muscle locks. You may even try Jalandara bandha, in this pose.
- Open your eyes; take your left ankle in your hands and slowly lower your left foot to the floor, and then take your right ankle in your hands and lower your right foot to the floor.
- Relax for a few breaths in the Easy Posture.
The Benefits :
- This Asana is useful in constipation and improves digestive power.
- It helps in keeping the spine erect.
- It is beneficial in Arthritis.
- Those, feeling trouble in performing this Asana should not force themselves.
- This is the best asana for meditation. It is helpful in concentration of the mind and upward movement of the prana.
The Mountain Pose : Parvatasana

How to do it :
- Sit erect in Padmasana
- Form a firm finger lock.
- Inhaling, stretch the arms with the finger-lock vertically above the head without raising the seat and knees.
- Turn the palms up exactly above the centre of the head.
- Exhale.
- Inhaling again, stretch your arms upwards from the shoulder blades and stretch the trunk to the maximum without moving from your seat.
- Maintain this posture, holding your breath.
- Exhaling, resume the starting position.
- You can also perform the pose with the palms joined together and fingers stretched up.
The Benefits :
- Parvatasana helps develop a proper breathing technique.
- With regular practice of the pose, your lung capacity will increase.
- Parvatasana helps reduce flab from the abdomen, tummy, hips and the waist.
- The pose has a slimming effect on the physique.
- The spine and ribs are stretched.
- The abdomen, pelvis and side muscles are pulled up and hence get toned.
- Muscles of the diaphragm develop strength.
The Turned Side Angle Pose : Paschimottanasana
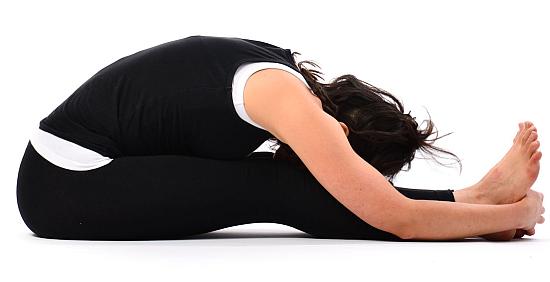
How to do it :
- Sit upright in Sukhasana, keeping the head, neck and spine erect.
- Stretch your legs straight out in front of you and keep them together.
- Keep the knees straight.
- Place the palms on the respective knees.
- Bend your trunk and head slowly forward and downward from the waist. While doing this, slide forward the hands along the shins and grasp the corresponding big toes with the index finger, middle finger and thumb of each hand without bending the knees.
- Keep the head between the upper arms and pull the big toes steadily. While doing so, bend further forward, curve the spine and aim your forehead towards the knees.
- Take a deep breath and exhale slowly.
- Lower the head down as far as you can towards the knees, drawing in your abdominal muscles gently, still grasping and pulling the big toes and keeping the knees straight.
- Bend the arms nd rest the elbows gradually on the floor.
- Using the elbows as levers, rest your forehead on the knees which should not be raised or bent. 11. Exhale completely.
- Holding out your breath, stay in this posture for a few seconds or as long as you are comfortable.
- Return slowly and smoothly in the reverse order to the starting position.
- Freely exhale and inhale until your breathing returns to normal.
The Benefits :
- Paschimotanasana is a fine stretching exercise for the back of the whole body, from the heels to the top of the spine. In one continuous movement, almost all the posterior muscles of the body, particularly the hamstring muscles at the back of the thighs and the muscles of the small of the back, are fully stretched and relaxed. The muscles of the neck, chest, shoulders, the spinal column, hips and the recti are also brought into play.
- This asana stretches the spine to its maximum length, which makes it supple and flexible.
- The asana stretches the ribcage and its regular practice will expand the lungs more.
- The practice of this asana improves digestion and the peristaltic action of the bowels.
- The joints of the arms, elbows, shoulders, legs, knees, ankles and hips become more elastic.
- This asana is good for reducing fatty deposits in the abdomen, hips, backside and thighs. Obese persons may repeat it as many times as possible to reduce their waist and protruding belly.
- The loins and the waist get into good shape. The legs also become firm and develop evenly.
- This asana rectifies minor postural defects and deformities in the curvature of the spine, and helps a person to attain his full stature.
- Paschimotanasana gives relief in cases of sciatica, muscular rheumatism of the back, backache, lumbago, slipped disc and asthmatic attacks.
- It is a good remedy for constipation, dyspepsia, flatulence, belching, hiccoughs and digestive disturbances.
- It can be recommended for the enlargement or sluggishness of the liver and spleen.
- It will check the development of piles and prevent several functional disorders of the intestines.
- Diabetic patients may practice this asana with advantage as it activates the pancreas.
- It helps overcome many menstrual disorders.
- Daily practice of this asana helps to cure impotency and seminal weakness, increases vitality, and enhances the power of sex control.
The Posterior Stretch : Parivrtta Parsvakonasana

How to do it :
- Stand with the feet together and the arms by your sides (see the tad-asana). Inhale and spread your legs apart slightly further than shoulder distance (about 3-4 feet).
- Stretch your arms straight out from the shoulders parallel to the floor with your palms facing down.
- Exhale slowly and turn your right foot toward the right 90 degrees. Bend your right knee about 90 degrees.
- Place the palm of your left hand flat on the floor next to the outside of your right foot. Rest the right elbow on the outside of the right knee.
- Stretch the right arm over your head, parallel with the floor, with the inside of the elbow resting on the ear. Hold for abot 30-60 seconds while breathing gently through the nostrils.
- Slowly return to a standing position and repeat on the other side reversing directions 2-6.
The Benefits :
- Parivritta Parshvakona Asana has many benefits. It stretches our muscles on the sides of the upper body and gives them strength and flexibility.
- The Parivritta Parshvakona Asana stretches the muscle group along the side of the torso.
- This posture also strengthens the ankle, calve and thigh muscles.
- Our arms also benefit from this posture.
- This posture is an excellent way to tone the hips and waist muscles.
- This posture also strengthens the digestive system and thus aids digestion, stimulates blood circulation and assists in restoring strength and flexibility to the spine.
The Wind Relieving Pose : Pavanamuktasana

How to do it :
- Lie flat on the back in the shava-asana.
- Inhale and bend the right knee and pull it close to the torso with both hands while interlocking the fingers just below the knee. Keep the left leg flat on the floor.
- Hold the inhaled breath for a few seconds then exhale slowly through the nostrils and lift the back, shoulders and head off the floor and touch the knee with the forehead.
- Hold the exhaled breath for a few seconds then slowly inhale and return the back, shoulders and head to the floor. Remain holding the knee.
- Hold the inhaled breath for a few seconds then exhale while bringing the right leg to the floor.
- Lie flat on the back in the shava-asana for a few seconds then repeat beginning with the left leg.
- Hold each of the four parts of this posture (corresponding with the held breaths) for three to five seconds each. Repeat the purvasa-mukta-asana three to five times on each side.
The Benefits :
- This asana helps in removing the gases accumulated in the digestive tract. It is good for relieving pain in the back or abdomen. It improves the functioning of liver, spleen, stomach, kidneys and pancreas. Helps to tone the abdomen and develops elasticity in the diaphragm.
The Shoulder Stand Pose : Sarvangasana

How to do it :
- Lie flat on the back in the shava-asana.
- Inhale through the nostrils. Place the palms face-down on the floor. Keeping the hips on the floor, bend the knees and bring them up toward the stomach while exhaling.
- Inhale slowly through the nostrils, press down on the hands and lift the torso from the waist up off the floor, arching the spine backwards and straightening the arms. Keep the hips on the floor.
- Inhale, then while exhaling, raise the legs straight up perpendicular to the floor. You may support your hips with your hands or leave the arms flat on the floor, whichever is most comfortable.
- The legs should be together with the knees straight and toes pointed straight up. Keep the head straight without turning it to either side. The chin should be pressed against the chest.
- Breath gently through the nostrils while the posture is held.
- Reverse the steps to return to the shava-asana.
The Benefits :
- The sarvanga-asana is considered by many to be the most beneficial of all yoga postures. Because of its many benefits, if you find that your time is limited in the course of Yoga practice at home, it is recommended to place special emphasis on the sarvanga-asana.
- When performed in the morning the sarvanga-asana relieves fatigue caused by sleeping too much or too little and when practiced in the evening it helps to promote deep, restful sleep. It strengthens the back and helps to relieve lower back pain.
- The increased blood flow to the head and upper body helps to heal many disorders such as headaches, nasal congestion and sore throats. The entire endocrine, digestive, nervous, and venous systems of the body are stimulated in ways that no form of diet or conventional exercise can perform.
- Because the body is inverted a rich supply of oxygenated blood is sent to the organs and glands in the upper part of the body, such as the brain, thyroid and pituitary, and heart thereby stimulating them. Pressure is relieved from the lower body extremities relieving pain and/or swelling of the feet and legs.
- The sarvanga-asana also provides great benefit to the abdominal organs helping to relieve gas and constipation and stimulate digestion. Regular practice of this posture invigorates the mind and helps to calm the nervous system.
The Locust or Grasshopper Posture : Shalabhasana

How to do it :
- Lie on the stomach with the head turned to one side and the arms alongside the body with palms facing upward.
- Turn the head and place your chin on the floor. Slide your hands under your thighs, with the palms pressed gently against the top of your thighs.
- Inhale slowly and then raise the head, chest, and legs off the floor as high as possible. Tilt your head as far back as possible. Keep your feet, knees, and thighs pressed together.
- Starting at the top of the head and working your way down to the feet, bring your attention to each part of your body, consciously relaxing it before proceeding on to the next.
- Remain in the posture while holding the breath. You can support your legs by pressing the hands upward against your thighs.
- Hold the posture for as long as you can hold the inhaled breath then slowly return the legs, chest, and head to the floor while exhaling.
- Remove your hands from under your thighs and place the arms alongside your body. Turn your head to the side and rest.
The Benefits :
- Muscles of lower back and legs get strengthened.
- It helps reduce flab from thighs, hips, waist, abdomen and buttocks.
- Waist becomes supple and resilient.
- Heart muscles get massaged and function well.
- Regular practice of the pose can get rid of a bulging tummy.
- Edema of ankles and feet can be treated with Shalabahsana.
- Regular practice of the pose increases lung capacity.
- Faulty spinal curvature is corrected.
- Person suffering from bronchitis can get relief with this yoga pose.
The Corpse Pose : Shavasana

How to do it :
- Lie flat on your back with your legs together but not touching, and your arms close to the body with the palms facing up.
- Keep your eyes gently closed with the facial muscles relaxed and breath deeply and slowly through the nostrils.
- Starting at the top of the head and working your way down to the feet, bring your attention to each part of your body, consciously relaxing it before proceeding on to the next.
- Remain in the shava-asana for between 3 and 5 minutes or longer. If you become sleepy while in the shava-asana begin to breath a bit faster and deeper.
The Benefits :
- The ardha-chandra-asana is a basic stretching and balancing pose that benefits principly the lower back, abdomen and chest. It is equally suitable for use in your stretching routine as well as formal asana practice. the benefits can be numerated as:
- While many consider this a simple posture at first, its simplicity eventually proves to be deceiving. The goal of the shava-asana is for the body and mind to be perfectly still and relaxed. Not only should the body be motionless and at ease, but the mind as well should be quiet, like the surface of a still lake. The result will be a deep and stable relaxation that will extend into your meditation or be felt through the activities of your daily circumstances.
- It goes without saying that the shava-asana will take some time to perfect. You will find the simple exercise of focusing your attention on each part of your body and consciously directing the breath there to be a great help with this posture.
- There are two common obstacles that can prevent you from fully benefitting from this posture: sleepiness and a restless mind. If find yourself getting drowsey while in the shava-asana increase the rate and depth of your breathing. If your mind is restless or wondering focus your attention on all of the bodily senations you're experiencing. Bring your mind to the sensation of the floor beneath you or on the rhythm of your breath.
The Hare Pose : Shashankasana

How to do it :
- Sit in Vajrasana
- Inhale and raise your arms above your head
- Exhaling bend forward from your waist and keep your palms on the floor. Your abdomen must be pressing against the thighs and your buttocks must be resting on your heels.
- Bring your forehead to the floor and keep the hands stretched in front of you with palms on the ground.
- Inhale and return to Vajrasana
The Benefits :
- Strengthens the muscles of the legs and thighs
- Improves flexibility of the back
- Helps relieve stress.
- Improves skin texture
- It exercises the lower abdomen and improves digestion. It also relieves stiffness of the spine.
The Accomplished or Adept Pose : Siddhasana

How to do it :
- The siddha-asana is complicated to describe but is actually one of the simpler sitting postures. It requires less flexibility of the legs than the padma-asana yet it facilitates relaxation, concentration and ultimately, meditation.
- Begin in a seated posture. Bend the left knee and grasp the left foot with both hands and place the heel against the perineum and the sole of the foot against the inside of the right thigh.
- Exhale and reach down and loop the forefinger of the right hand around the big toe of the right foot and grasp the left foot with the left hand.
- Bend the right knee, grasp the right foot with both hands and place the outside edge of the right foot where the calf and thigh of the left leg meet, right ankle over left ankle. The heel of the right foot should line up approximately with the navel and be as close to the pubic area as possible.
- With palms up, place the hands on the knees, form a circle with the thumb and forefinger and extend the remaining fingers straight ahead.
The Benefits :
- Siddha-asana helps to establish an equilibrium throughout the body/mind.
- It will also help stretch the legs and pelvic area to the point where the padma-asana can be held effortlessly. Either posture, by creating a firm foundation with the legs locked in a crossed position and the spine held straight and motionless, awakens the attention and helps cultivate concentration.
- When concentration is highly focused and undistracted, meditation follows.
The Lion Pose : Simhasana

How to do it :
- Sit up on the knees with the heels of the feet pressed against the buttocks and the calves of the legs flat on the floor.
- Place the balls of the hands on the knees, straighten the arms and keep the back erect and the head straight (not tilted forward, back, to the left or the right).
- Inhale while leaning forward slightly, stretching the mouth the jaws as wide as possible, extend the tongue out and downward as much as possible, fix your gaze either at the tip of the nose or between the eyebrows and stretch the fingers straight out from the knees.
- Hold the posture for the duration of the inhaled breath then exhale, relaxing the forward stretch, dropping the fingers to the knees and closing the mouth and eyes.
The Benefits :
- The simha-asana benefits parts of the body that most other asanas do not: the face, jaw, mouth, throat and tongue. Those who experience tightness or discomfort in the jaws such as teeth grinding, clenched jaws, a misaligned bite, etc. will benefit from both the jaw and tongue stretching of the simha-asana.
- This asana is also known to help prevent or cure sore throats.
- The muscles and tissues of the face are rejuvenated from the alternating stretching and release, an exercise they rarely get in the course of our everyday lives.
- The fixed gaze relieves tense or burning eyes and the stretched fingers benefits the hands and wrists.
The Headstand : Sirsh Asana

How to do it :
- Kneel down on your yoga mat.
- Interlock the fingers of your hands and place them and your forearms on the extra padding on the yoga mat.
- Keep the elbows fairly close together.
- Place the back of your head into the hollow of the palms (not on the palms or fingers). Rise up off your knees and take a step or two towards your head.
- Inhale, and slowly raise the legs until they are vertical.
- Keep your back straight and try to relax.
- Breathe slowly and deeply from the abdomen.
- Concentrate on the brain or the pineal gland between the eyebrows.
- To come down, bend your knees and lower one leg and then the other.
- Do the headstand for fifteen seconds at first, adding fifteen more per week. The maximum time for it should not be more than twelve minutes, if it is done in conjunction with other exercises.
The Benefits :
- The headstand increases circulation to the brain, which causes improved brain function (intelligence and memory) and increased vitality and confidence.
- It improves many ailments, such as nervousness, tension, fatigue, sleeplessness, dullness, fear, poor blood circulation, bad memory, asthma, headaches, constipation, congested throat, liver or spleen, for female disorders, the initial stages of eye and nose troubles, and general lack of energy, vitality or self confidence.
- It stimulates four of the most important endocrine glands - the pituitary, the pineal, the thyroid, and the parathyroid glands that are responsible for our very existence, for they keep the body mechanism in good working order. Pituitary gland is called the master gland of the body. As a consequence, the practice of the headstand helps us to get relief from many of our troubles, physical as well as mental, or to prevent them. It has a very beneficial effect on the whole body.
- It promotes hair growth by increasing circulation to the scalp.
- It helps to put the spine into correct alignment.
- It restores the position of vital organs by reversing gravity.
- The quality of sleep is improved. Poor sleep is often due to an excess of nerve impulses from the reticular formation to the cerebral cortex in the brain. The headstand causes an increase in circulation to the neck, which stimulates the baroreceptors in the neck. This calms the reticular formation down, causing reduced nerve impulses to the cerebral cortex. This results in a peaceful, deep steep.
The Pelvic Posture : Supta Vajrasana

How to do it :
- Sit in Vajrasana.
- Lean back slowly from the waist with the support of your elbows till your head, shoulders and back touch the ground in easy stages without raising your knees from the floor or changing the position of the legs.
- Allow your back to come close to the ground and lie supine.
- Cross the arms and place the palms beneath the opposite shoulders so that the crossed wrists serve as a cushion for the head.
- Keep the knees together and touching the ground.
- Close your eyes.
- Catch hold of the ankles and return slowly to the starting position in the reverse order with the help of the elbows.
The Benefits :
- This asana massages the abdominal organs alleviating digestive ailments and constipation.
- It tones the spinal nerves, makes the back flexible and realigns rounded shoulders. The nerves in the neck, the thyroid and parathyroid glands are particularly stimulated.
- The ribcage is stretched and expanded fully, which helps to fill the lungs to its piaximum capacity and bringing more oxygen into the system.
- It enhances courage and confidence level in the personality.
- It is beneficial for those suffering from asthma, bronchitis and other lung ailments.
- It loosens up the legs and strengthens them in preparation for sitting in meditation asanas.
- It enhances creativity and intelligence as it increases the circulation in the brain.
The Sun Salutation Pose : Surya Namaskar

How to do it :
Following 12 poases are to be done in sequence:- Pranamasana
- Hastauttanasana
- Hasta Padasana
- Ashwa Sanchalanasana
- Ashtanga Namaskara
- Bhujangasana
- Parvatasana
- Ashwa Sanchalanasana
- Hasta Padasana
- Hastauttanasana
- Tadasana
The Benefits :
- Improves Blood Circulation of the Body
- Help in reducing excess weight around your stomach
- Good Maintenance of Over-all Health
The Palm Tree Pose : Tadasana

How to do it :
- Stand straight with toes and heels touching.
- Raise the hand above the head.
- Interlock the fingers and turn it upwards. The palms should be facing the sky.
- Take a deep breath and stretch the arms, shoulders and chest upwards.
- Raise the heels so that the weight of the body is borne by the toes.
- Stretch the whole body from the feet to the head.
- Remain in this position for few seconds.
- Bring down the heels while breathing out.
- This is one round. One can practice up to 10 rounds.
- During the whole practice the eyes should remain steadily fixed in front little above the head level.
- Then tighten the thighs, pull belly in, press shoulders back and keep arms beside torso.
- Breathe deeply, hold and then exhale.
The Benefits :
- The proper execution and continual practice of the tada-asana along with other postures helps to re-train the body to stand correctly and reverse the negative effects of poor posture.
- When the tad-asana is performed properly and the mind is focused and free of distraction, the body is experienced as being rooted firmly to the earth and as steady and motionless as a mountain.
The Triangle Pose : Trikonasana

How to do it :
- Stand with the feet together and the arms by your sides ( see the tada asana).
- Separate the feet slightly further than shoulder distance apart.
- Inhale and raise both arms straight out from the shoulders parallel to the floor with the palms facing down.
- Exhale slowly while turning the torso to the left, bend at the waist and bring the right hand down to the left ankle. The palm of the right hand is placed along the outside of the left ankle. The left arm should be extended upward. Both legs and arms are kept straight without bending the knees and elbows.
- Turn the head upward to the left and gaze up at the fingertips of the left hand. Inhale and return to a standing position with the arms outstretched.
- Hold this position for the duration of the exhaled breath. Exhale and repeat steps 4 - 6 on the opposite side
- Remain in the forward bending position for the duration of the exhale breath. Do two or three repetitions (one repetition consists of bending forward on both sides).
The Benefits :
- The trikona-asana is an excellent posture to do early in your routine. The forward bending and lifting stimulates blood flow and helps to stretch and relax the back, shoulders, legs and arms as well as increases the flow of blood to the head.
- The muscles of the thighs and calves as well as the hamstrings are stretched.
- The slight twist of the spine creates suppleness in the spinal discs and relieves lower back discomforts.
The Camel Pose : Ushtrasana

How to do it :
- Sit up on the knees with the heels of the feet pressed against the buttocks and the calves of the legs flat on the floor.
- Reaching backward, grasp the left ankle with the left hand and right ankle with the right hand.
- Inhale through the nostrils and lift the buttocks off the legs arching the back and thrusting the abdomen forward and tilt the head as far back as possible.
- Either hold the posture for the duration of the inhale breath or breath gently through the nostrils while holding the posture.
- Exhale and return to the kneeling position.
- Hold the posture for the duration of the inhaled breath. If you choose to breath while holding the ushtra-asana, hold it for between thirty seconds to one minute. Repeat the posture three times.
The Benefits :
- This pose helps expand the chest and thus increases lung capacity.
- Stimulates the organs of the throat and abdomen.
- The entire chest, abdomen and neck get a good stretching making them flexible.
- Slouching can be rectified with regular practice of Ushtrasana.
- The lumbar vertebrae are massaged and they attain flexibility. Stretches and strengthens the back muscles, deep hip flexors (psoas), thighs, ankles, groin and the front of the whole body.
- Helps improves posture
The Chair Pose : Utkatasana

How to do it :
- Stand erect with your feet slightly apart. Stretch your hands to the front with palms facing downwards.
- Do not bend your elbows.
- Bend the knees and gently push your pelvis down as if you are sitting in an imaginary chair.
- Be comfortable or at least try to be.
- Ensure that you keep your hands parallel to the ground.
- With awareness, sit straight and lengthen your spine.
- Relax.
- Sink deeper into the chair by gradually going down but ensure that your knees don’t go beyond your toes.
- Keep going down slowly and then sit down in Sukhasana (cross-legged posture). If you want, you may lie down on your back and relax.
The Benefits :
- Strengthens the spine, calves, thighs and ankles. Stretches the chest and shoulders.
- Stimulates the heart, diaphragm and abdominal organs.
- Helps reduce fat in the body, especially in the buttocks.
- Helpful in conditions like arthritis and joint pain.
- Improves functioning of the immune system.
The Raised Leg Pose : Uttanapadasana

How to do it :
- Lie down on the floor on your back with your legs straight and joined together.
- Keep your hands on either side, palms facing down.
- Inhale and raise both the legs from the ground.
- Knees should be straight and toes pointing outward.
- Keep raising your legs till they are perpendicular to the ground.
- Fix your gaze at the toes.
- Maintain this posture for as long as you can, breathing normally.
- Exhale and lower your legs gradually.
The Benefits :
- Waist and thighs lose fat and get trimmer.
- The muscles of the abdomen and lower back become stronger.
- Leg muscles are stretched and toned.
- Regular practice of Uttanapadasana improves digestion.
The Thundbolt or Diamond Pose : Vajrasana

How to do it :
- The vajrasana is a seated posture.
- Begin by sitting back on your heels and placing your knees, legs and feet together.
- Keeping the back straight place the palms of your hands down on top of your thights.
- Breath gently thorugh your nostrils and sit in this position for at least three minutes.
- The Vajrasana can be held for as long as is comfortable (and depending on the reason for doing the posture.
- The Vajrasana is a versatile posture well suited for meditation, rest in between other seated postures, or as an aid to digestion.
- The Vajrasana is the first stop in various other yoga postures such as the Anjaneya Asana (Salutation Posture) and the Ushtra Asana (Camel Pose.
The Benefits :
- Vajrasana improves the flow of blood and nervous impulses in the pelvic region and strengthens the pelvic muscles.
- Vajrasana is a preventative measure against hernia and also helps to relieve piles.
- Vajrasana increases the efficiency of the entire digestive system, relieving stomach ailments such as hyperacidity and peptic ulcer.
- Vajrasana reduces the blood flow to the genitals and massages the nerve fibers which feed them, making it useful in the treatment of dilated testicles and hydrocele in men.
- Vajrasana is a very important meditation posture because the body becomes upright and straight with no effort. Vajrasana is the best meditation asana for people suffering from sciatica and sacral infections.
- Vajrasana helps to keep blood pressure under control.
- The special fold of the legs forms one Bandha in Vajrasana. Consequently the blood circulation in the waist - downward portions is controlled. For this reason Vajrasana is recommended after Shirshasana.
The Warrior Pose II : Virbhadrasana II

How to do it :
- Start with the Mountain Pose.
- Jump or walk so that your feet are around four feet apart.
- Inhale and raise both arms parallel to the floor, turn your head to the left, turn your left foot 90 degrees and right foot about 45 degrees.
- Exhale and bend your left knee (trying to keep the knee just above the ankle, it can be before the ankle but don't let the knee go away from the ankle). Keep the hips in the same angle (180 degrees) as for the arms. Stay in this position for 30 seconds to one minute breathing normally.
- Inhale straighten your knee and exhale hands down and come back to the mountain posture.
The Benefits :
- Strengthens and stretches the legs and ankles
- Stretches the groins, chest and lungs, shoulders
- Stimulates abdominal organs
- Increases stamina
- Relieves backaches, especially through second trimester of pregnancy
- Therapeutic for carpal tunnel syndrome, flat feet, infertility, osteoporosis, and sciatica
The Half Shoulderstand : Viparita Karani

How to do it :
- Lie flat on your back and keep your legs together.
- Keep your arms on their respective sides.
- Inhaling, press your palms down and raise your legs slowly together.
- Without bending the knees or raising the hands till they are perpendicular to the floor.
- Exhale Completely.
- Inhale deeply and exhale slowly.
- While exhaling, press the palms down again and without bending the knees or raising the head, move the legs towards the head.
- While doing this, raise the hips and the small of the back also from the floor and curve up the lower part of the spine.
- Bring the legs parallel to the Root.
- Take a deep breath and breathe normally a few times.
- Bend the arms at the elbows and support the slanted trunk with the palms which should press the upper portion of the posterior on each side.
- Inhaling, bring back the legs again perpendicular to the floor, using the elbows as a fulcrum.
- Exhale and breathe normally.
- Keep the knees straight and the feet together.
- Fix your gaze on the tips of the big toes.
- Maintain this position for about three minutes.
- Return to the starting position in the reverse order.
The Benefits :
- Movements in Viparita Karani stimulates abdominal organs and hence stimulates digestion and is good against constipation and other digestive problems. Additionally you increase your appetite through this stimulation.
- Urinary system also benefits from this movement as do women’s reproductive organs. With regular practice of this exercise, women can thus avoid menstrual cramps and problems of the premenstrual syndrome as well as the menopause.
- As this yoga pose is an inversion, the blood circulation is stimulated and upper body and head receives a stronger blood flow which supplies the whole area with oxygen. Through this, migraines and headaches, caused by poor blood circulation, can be healed and prevented.
- Pimples, boils and acne problems also are reduced by this increase of blood flow. Additionally it is said that such inverted poses are good against losing hair and getting gray hair.
- It is also a great exercise for anybody who wants to prevent or deal with high or low blood pressure. Blood and other body fluids stuck in the legs and causing swelling, get into movement again and thus the swelling will reduce.
- This yoga asana strengthens arms and legs but also back and neck muscles. Through the bending of neck, your throat and chest are squeezed together. In this way respiratory system to open to its full extent. The pressure is also said to help men who are suffering from goiter.
- Movement of joints in this asana keep them active in a rather gentle motion which is good against arthritis.
- Through the additional blood flow in head, you get more oxygen which is beneficial for very problems like insomnia but which also lifts your spirits and helps against depression and anxiety.


0 Comments